Crop Photo
Adjust crop manually. You can move, resize and rotate the crop frame with the mouse.
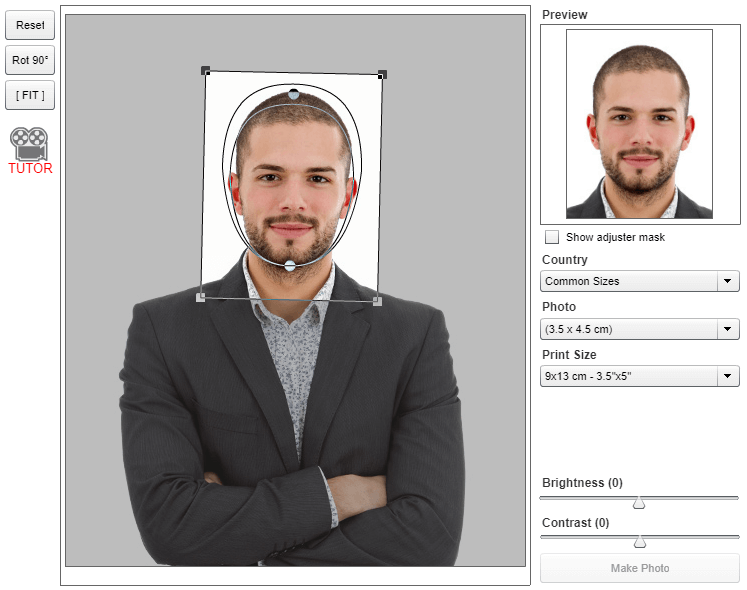
Editing the photo
Adjusting the crop frame
There is a contour shape inside the crop rectangle. Adjust this contour to the head of the model. Move the bottom control point of the contour to the chin. Move the upper control point to the top of the head. You can move the crop frame with inside pressed mouse button. You can resize the crop frame with the corner points. You can rotate the crop frame with outside pressed mouse button. You will able to watch a tutorial about adjusting the crop frame if you click on the [TUTOR] button.
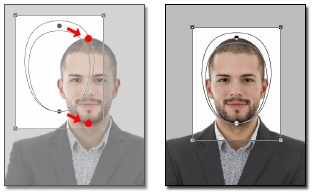
Aright adjusted control points
Show biometric/adjuster mask
You can show the biometric or adjuster mask while you are editing the photo. The biometric or adjuster mask helps you to set the editing photo more accurately. Biometric passport photo is used to in Germany mainly.
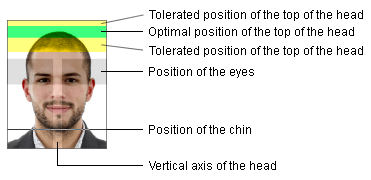
Biometric mask
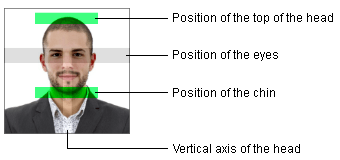
Adjuster mask
Passport photo standard for children
In certain countries, there are special regulations for child’s passport photos. If you create passport photo for children, then will make sure there isn’t separate passport photo standard for children in the chosen country. If exists separate standard for children, then use it.
[Reset]
You can cancel all editing operation if you click on the [Reset] button.
[Rot 90°] Rotate photo 90 degrees
You can rotate the photo 90 degrees if you click on the [Rot 90°] button. You need use this function if the camera was rotated 90 degrees when the photo was taken.
[Fit] Maximization of crop frame
You can align the crop frame to the borders of the photo with [Fit] button. You have to use the [Fit] function if you have uploaded pre cut photo or the model was too close to the camera. We don't suggest you upload pre cut photo. Because pre cut photo causes bad head size and bad photo size in most of the case. On the uploaded photo must have enough room around the head. In most of the cases can't be create good passport photo from pre cut photos.
Adjusting the eye position
In several countries, regulations determine the minimum and maximum distance of the eyes from the bottom line of the photo. In case of such countries, a horizontal stripe is displayed in the preview picture. Adjust the crop frame so that the eyes are visible in the horizontal stripe.


Choosing Country and Photo
You can choose another passport photo standard from the Country and Photo lists while you are editing the photo.
Print size
Choose the size option what you want from the Print Size list. As many photos will be put on the printable photo as its space allows. Choose such print size which is supported by your printer. The most supported size is 10x15 cm, which is equals 4x6 inches. Do not choose the Single Photo option if you print the passport photo.
Available sizes:
| Approximate metric(cm) | Real size(inch) |
|---|---|
| 9x13 cm | 3.5x5 inch |
| 10x15 cm | 4x6 inch |
| 13x18 cm | 5x7 inch |
| Single Photo | Do not use for printing. |
Creating CV and Green Card Photo
Choose the Single Photo option from the Print Size list, if you want to create a photo for cv or Green Card. If the Single Photo option is selected the Resolution list will be shown. You can set the photo quality with the Resolution list. Choose the 300 dpi option, if you want to create Green Card photo.
Adjusting brightness and contrast
You can set the brightness and the contrast with the sliders which are on the right bottom corner. You can repair the dark background photo if you increase the brightness and contrast values at the same time. Do not forget, if you increase the brightness then you have to increase the contrast about by the half of the brightness. Decreasing the contrast degrades the image quality in most of the cases. An only case when decreasing the contrast is suggested, when you are editing an overexposed photo.