Creating a passport photo
1. Take the photo
- Take the photo in front of a single colour possibly white background.
- Shoulders of the model should be visible, and there should be enough room around the head to crop the image.
- Make sure not to have any unwanted object in view when taking the picture.
- Take the photo in a room that is well lit with white light.
- Make sure not to have shadows on the face or the background.
- Make sure the camera is in the same height as the head.
- Make sure the model looks towards the camera with open eyes and with vertical head position.
- Make sure the model's mouth is closed and is not making faces.
- Use flash.
- Set the red eye removal function on the camera.
2. Uploading a photo
- Open the Main page.
- Choose the country, photo and print size.
- Select a print size which can be printed with your printer.
- Select a file to upload.
- Then click the Upload button.
Parameters of the photo to be uploaded
- File format: .JPG, .JPEG
- Bit depth: 24 bit
- Minimum dimensions of image: 130x200
-
Minimal image size for good photo quality: 800x800
(if the height of the head is one third of the image) - Maximum dimensions of image: 10000x10000
- Maximum file size: 10 MB
Dimensions of the photo: width x height (pixels)
Only the photos which meet the requirements above will be processed.
Do not upload:
- Picture taken with web camera.
- Scanned photo.
- Any photo that was not taken about somebody's face but another body part or object.
3. Cropping the photo
- After uploading the photo the Crop page will open.
- On the Crop page you can crop the photo with the crop frame.
- After cropping the photo click on the Make Photo button.
-
By clicking the
button on the Crop page, you can watch an animation presenting how to use the crop frame.
Using the Crop frame
The shape that appears within the crop frame, shows the head contour according to the chosen standard. The position and size of the head contour is set to the standard as well. You can move, resize and rotate the crop frame with the mouse.
You need to adjust the head contour to the head of the model. Set the top point of the head contour to the top of the model's head and the bottom point to the chin tip.
The preview always shows the image after cropping.
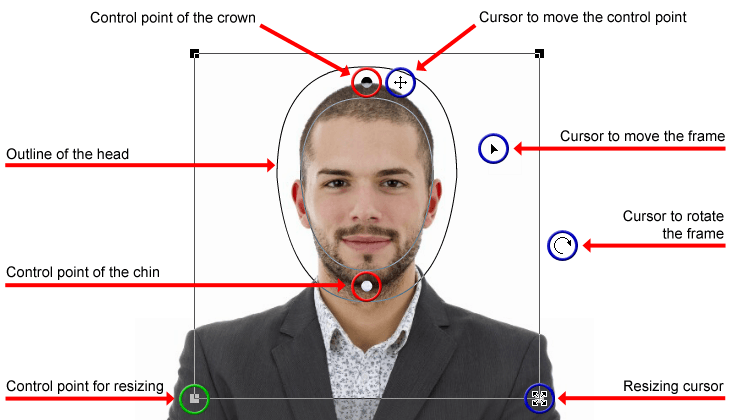
The Crop Frame
Key of signs
| Green circle: | Control points for resizing crop frame |
| Red circle: | Control points of head contour |
4. Downloading the passport size photo
- Once the photo is cropped, Download page opens from which the prepared photo can be downloaded.
- Click the Download link to download the image.
5. Printing the passport size photo
- Use a photo printer to print the passport size photo or print them in a digital photo lab.
- When printing, use an application with which you can print without resizing the image.
- Please do not use the built-in image viewer application of Windows, since it always resizes the images to be printed.
Frequent errors
1. Errors of processing
- Parameters of the uploaded image file are not appropriate.
- The uploaded file is not an image file.
2. Bad image size
- The printing application has resized the downloaded picture when printing.