Edit photo
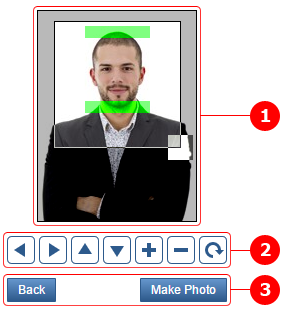
A rectangle shaped crop frame appears on the preview of the uploaded photo. Adjust the crop frame to the head as follows
- Adjust the bottom green rectangle to the chin.
- Align the upper green rectangle to the top of the head.
- You can move the crop frame with the move buttons.
- You can resize the crop frame with the scale buttons.
Move crop frame
The crop frame can be moved by clicking the four moving buttons. On the moving buttons, the direction of movement is indicated by the triangles on the buttons. By pressing the move buttons once, the cropping frame will move one pixel in the specified direction. By pressing the moving buttons continuously, the crop frame can be moved a greater distance. The crop frame cannot be moved beyond the border of the preview image. The moved crop frame will stop at the border of the preview image.
You can move the crop frame freely by moving the cursor inside the frame and then pressing the left mouse button. With this operation, you grab the frame, which you can then move freely by moving the mouse. Free movement is equally available on a mobile device. If you are using a mobile device, move one finger inside the cropping frame, and then tap the screen. This allows you to grab the cropping frame, after which you can move your finger to the desired location while holding your finger on the screen.
Resize crop frame
If you want to resize the crop frame, click the resize buttons. You can increase the size of the crop frame by clicking the + button. You can reduce the size of the crop frame by clicking the - button. With one click, the crop frame can be enlarged or decreased by one pixel. By continuously pressing the resize button, the size of the cutting frame can be continuously increased or decreased. You can only increase the size of the crop frame up to the preview border.
You can also freely resize the crop frame with the resize control in the lower left corner of the crop frame. Move the mouse cursor over the resize control, and then press the left mouse button. With this operation, you grabbed the resize control. While holding down the left mouse button, move the resize control until the crop frame is the desired size.
Rotate image
Click the rotate button to rotate the uploaded image 90 degrees to the correct orientation. Each click on the rotate button will cause an additional 90 degree rotation.
Elements of the photo editing interface
-
Preview
Displays the uploaded image. The image is bordered by a black frame. -
Editing buttons
Use these buttons to move, scale, and rotate the crop frame. -
Navigation buttons
They allow you to step back and forth in the processing process.
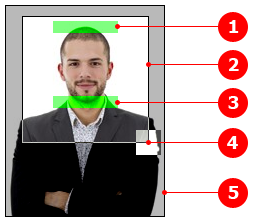
Elements of the preview
-
Crown rectangle
Semi-transparent green rectangle to be aligned with the top of the head. -
Crop frame
A rectangle whose edge is drawn in inverse color. The ratio of the sides of the rectangle is equal to the ratio of the sides of the passport photo standard selected during upload. The inverse color results in white for a black background and black for a white background. -
Chin rectangle
Semi-transparent green rectangle to be aligned with the tip of the chin. -
Resize holder
An inverse square in the lower right corner of the crop frame. You can use it to resize the crop frame. -
Uploaded photo
The part of the image outside the crop frame is covered with a semi-transparent gray layer, helping to visually separate the cropped area.
Editing buttons
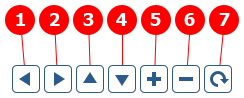
- Move left
- Move right
- Move up
- Move down
- Scale up
- Scale down
- Rotate photo by 90°
Navigation buttons
There are two buttons at the bottom of the Editor interface. Click on the "Back" button to go back to the previous page. You can finalize the crop settings with the "Make Photo" button. Clicking on this button to go to the download page from where you can download your passport photo.